
 PT
PT ES
ES
This article was initially published on 14/04/2021 and was updated for accuracy reasons.
Web push notifications are a proven way to boost the ROI of an affiliate marketing campaign. With push messages, you can motivate users to return to your landing page, make conversions, and even interact with your other CPA offers.
All of this is available with the push notification service provider Notix — and here is a detailed guide on how to leverage Notix and drive your campaigns to new heights.
Table of Contents
How Can an Affiliate Marketer Benefit from Push Notifications?
How to Integrate Notix Push Notifications?
- Integrating Web Push Notifications With Service Worker
- Parallel Testing
- Migrating Database from Another Push Service
How To Create Web Push Notifications?
Notix Features to Boost Your Campaigns Performance
- Targeting
- Creating Audiences
- Triggered Push
- Message Scheduling and Sending Time
- Performance Tracking
How Can an Affiliate Marketer Benefit from Push Notifications?
A short answer is: browser push notifications can improve the performance of your campaigns. But how does it happen exactly?
Here is how the flow looks:
- You integrate web push notifications to your offer’s landing page
- Users who visit this page see an opt-in request suggesting they subscribe to notifications
- All users who subscribe start receiving push messages — even if they don’t browse your page anymore.
- Web push notifications will arrive to users subscribed from their Windows, macOS, or Android web browsers.
So, your task is to create engaging push notifications related to the offer. For example, it can be a reminder for customers who haven’t converted yet — or a push notification with a similar offer for those who completed a conversion.
In other words, you can use push at any step of your funnel — and save much time and money on user acquisition and retargeting.
As a result, you get the following benefits for your campaign:
- Increase ROI of the media buying
- Improve CR of offers
- Get more final conversions
- Reduce the cost of leads
- Re-engage users and lead them to sales
How to Integrate Notix Push Notifications?
Notix offers very simple settings: you can implement and start using push notifications within minutes. Besides, if you already work with some provider, you can compare it with Notix before making your final decision.
And if you decide to continue with Notix after this test, we will keep your database safe and sound after migration.
Here is a quick guide on how it all works.
Integrating Web Push Notifications With Service Worker
In a nutshell, to start working with Notix, you need to add just two elements to your landing page code.
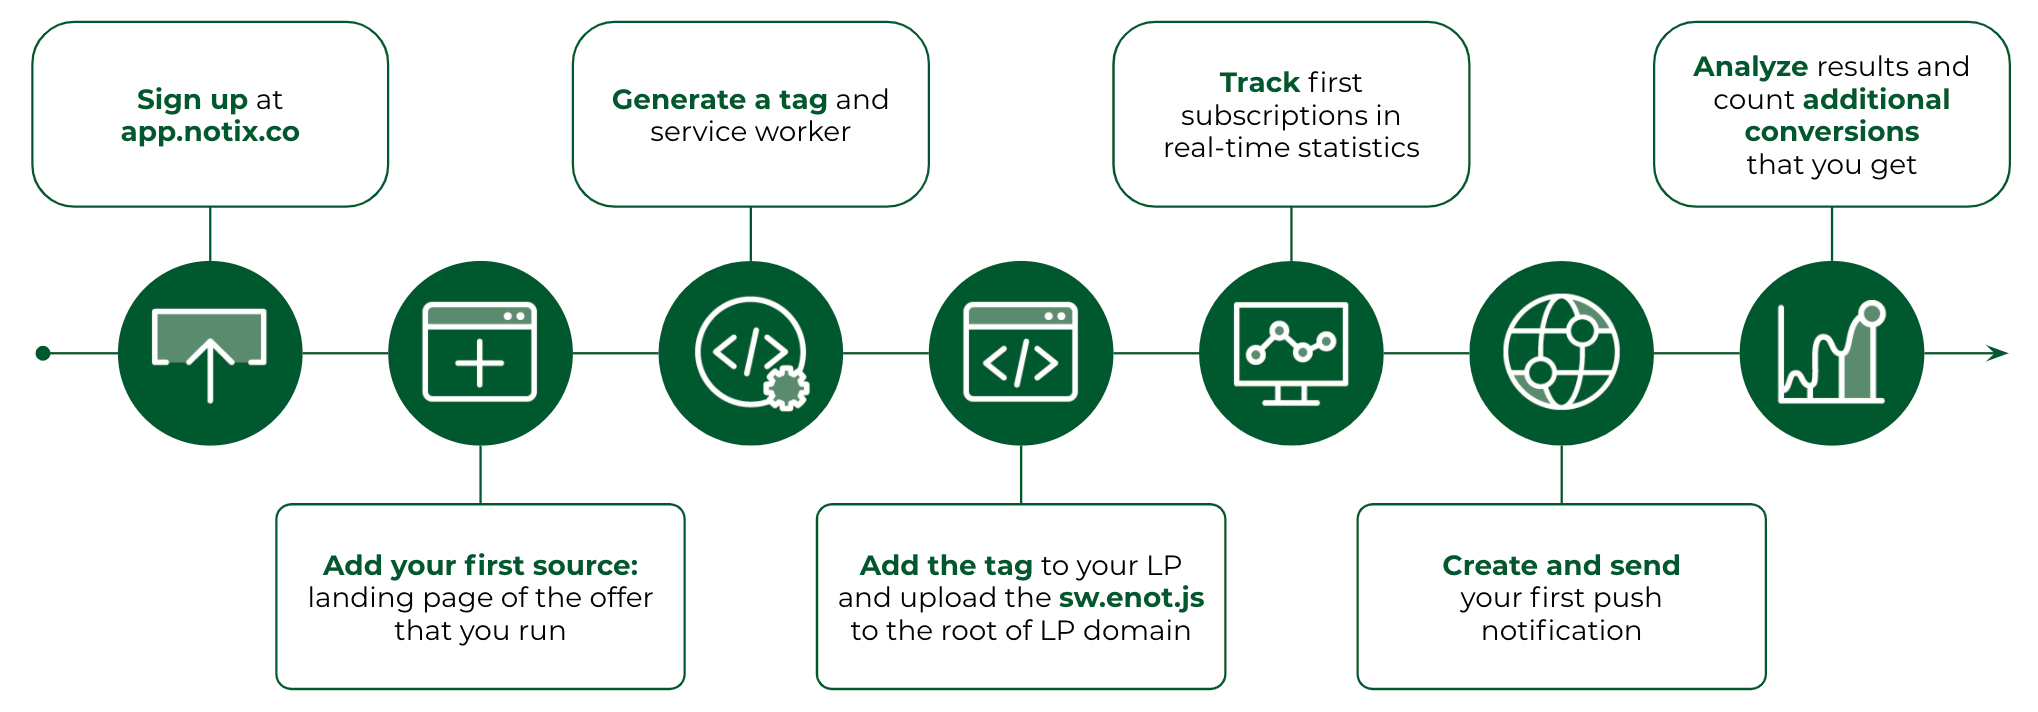
Here is a step-by-step guide:
1. Sign up at https://app.notix.co.
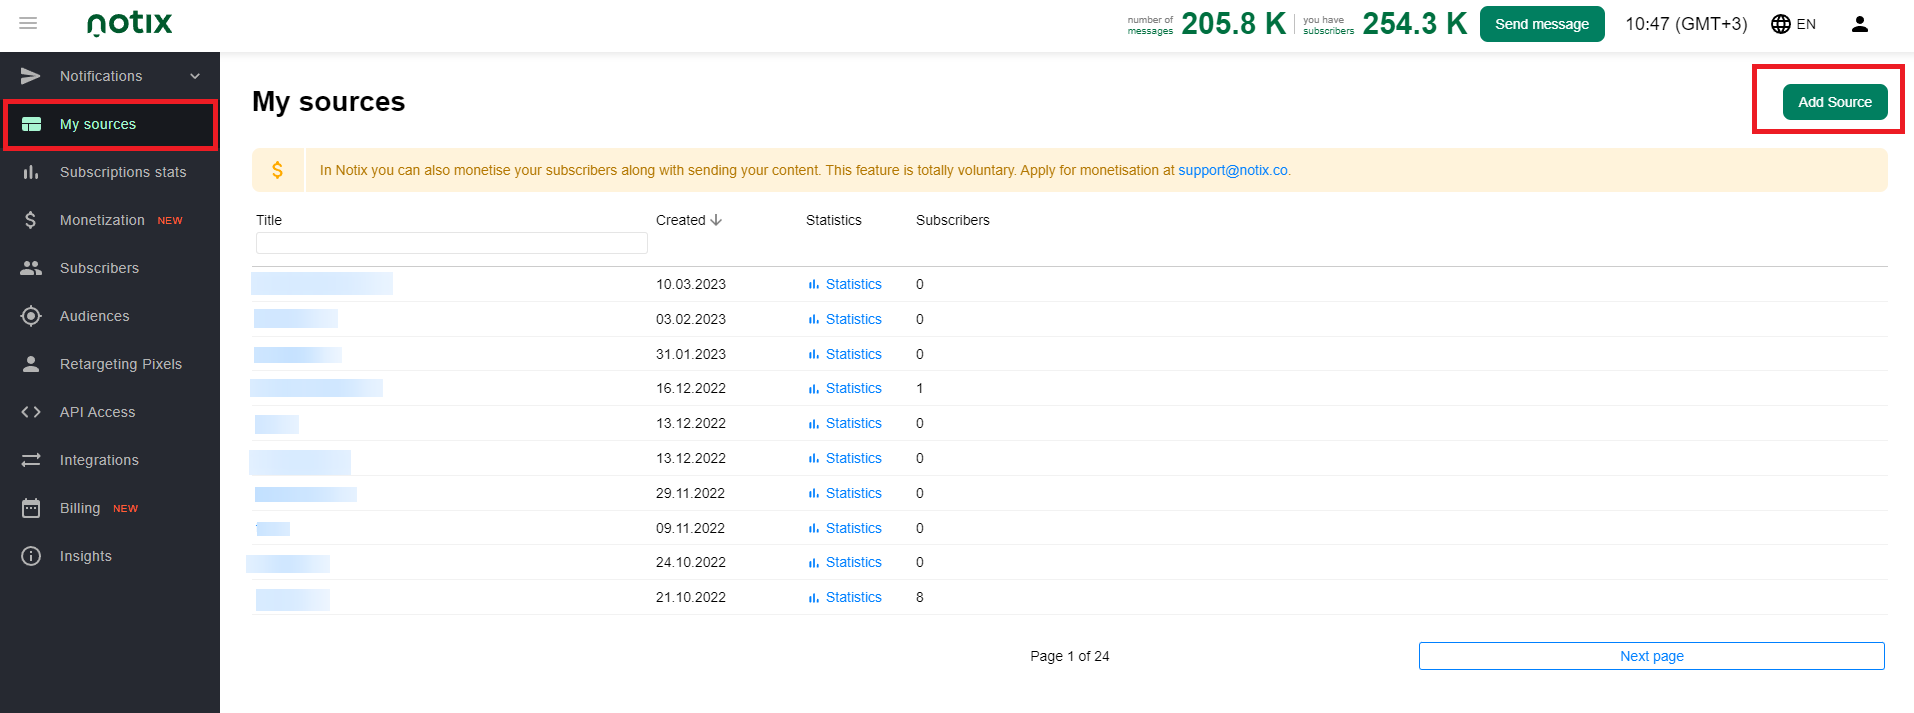
2. Go to the Sources tab and press the Add source button.

3. Add your first source: the landing page of the offer that you run. Press the Create source button.
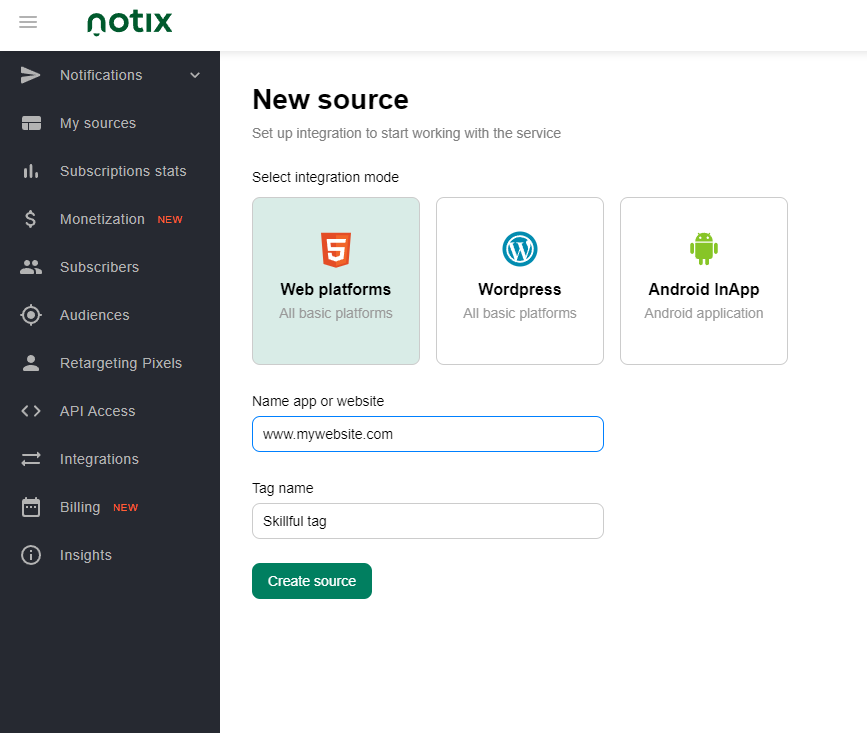
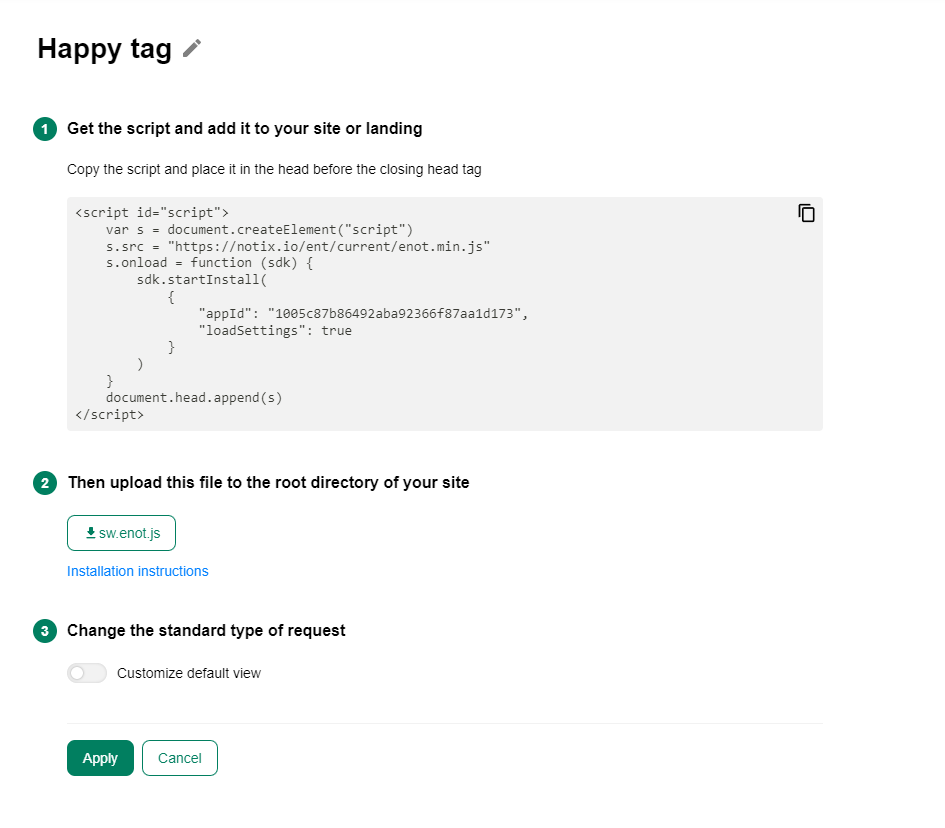
4. You will see a page with a tag (script), a service worker (js file), and settings for an opt-in prompt.
5. If you wish, you can customize the opt-in prompt on this step — or do it later.
6. Put the service worker file into the root directory of your landing page.
7. Put the tag into the head section of your landing page.
Here is a brief summary — you can use it as your quick sheet:
And here is a more detailed guide describing some nuances: How to integrate Notix?
If you do everything correctly, your landing page will start showing a subscription window.
Parallel Testing
Suppose you already have a web push notifications provider integrated into your landing page. Can you try Notix without canceling your current service?
Yes — easily. Just integrate Notix using the instructions above, and both providers will work simultaneously. We don’t charge anything for the testing period, so you will have a free trial month to compare the results.
To see more details on parallel testing, check out this article: How To: Parallel Testing With Notix
Migrating Database from Another Push Service
So your testing showed satisfying results. By the way, many of our partners immediately see their subscription rates grow when they switch to Notix. But you already have a subscriber base from your previous provider.
Can you keep it?
Yes. All you need is to change the service tag of your current push notifications service to the Notix tag. All subscribers will continue receiving your push notifications because they already allowed a domain (not a particular provider) to send them alerts.
How To Create Web Push Notifications?
You are done with the first settings! What’s next?
The very important part of your push marketing strategy is exactly the message you send.
How should it look to be effective? Let’s dive in.
Creating Opt-In Requests
First, you need to motivate a user to become a subscriber. Good news: Notix uses technologies that allow growing a subscriber base very quickly — and you can also boost the process with a customized opt-in prompt.
This prompt is the first notification your users see when they visit your landing page. You can choose one of the four prompt types — and also set the delay before showing it to a user.
So here is a quick opt-in prompts guide:
- Go to the My Sources tab on your Notix account and enter your Tag page.
- Choose the prompt type. Here are the available options:
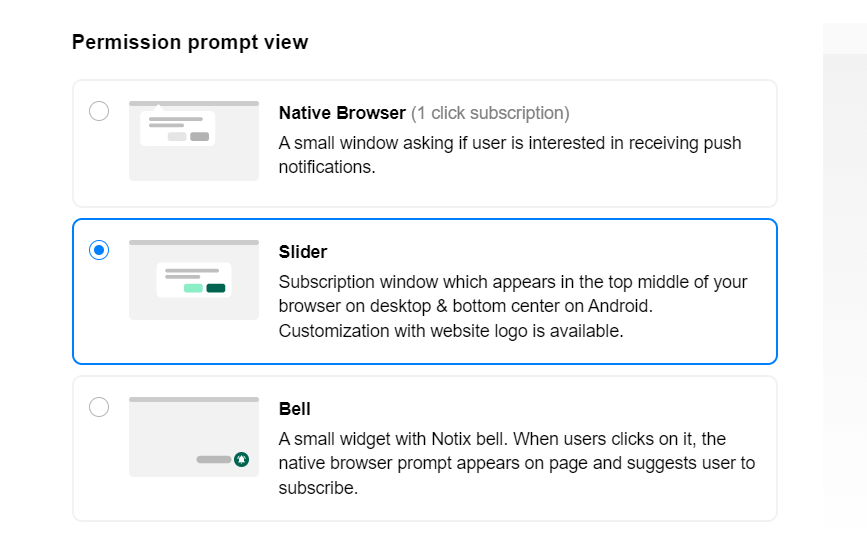
All the prompts, except the Native Browser, are customizable: you can change the message, the icon, add emojis, and your own button text.
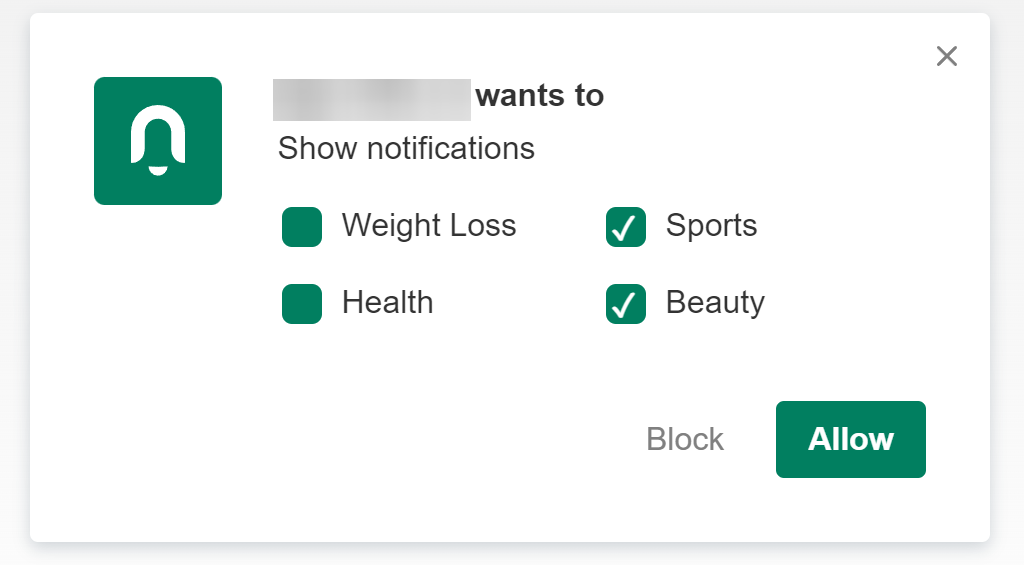
Besides, you can choose a special Categories prompt — just activate the Use Categories tumbler:
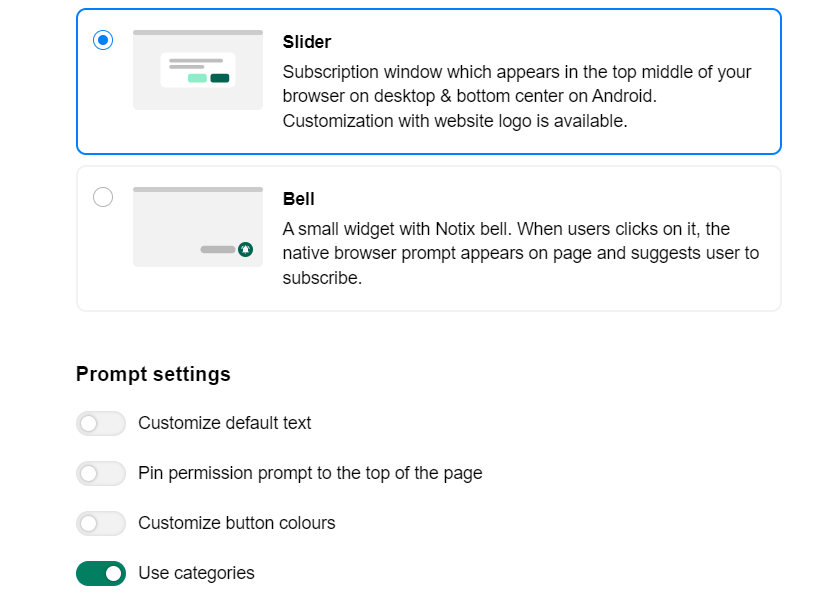
This prompt allows your subscribers to choose the topics they are interested in — and receive only the most relevant push notifications:
3. Set a delay before your opt-in prompt appears on your landing page. The point is to show it to users immediately, right when they visit your page — or after some time when they already have an idea of your offer.
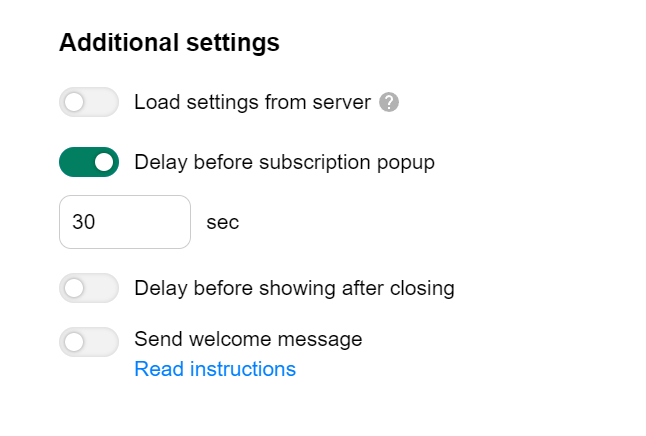
4. Set another delay — when do you want to show a subscription prompt again if a user closes it?
5. Finally, create a welcome message — the first notification a user will see after subscribing. It can be a simple ‘Thank you’ or some special offer — whatever you want.
Note: You can set the opt-in prompt before you download your tag for integrating Notix into your landing page. If you already have a tag and want to update prompt settings, don’t forget to press the Load settings from the server button.
Creating and Customizing Push Notifications
You only have a couple of seconds to grab a user’s attention — so make the most out of them. Here are the elements you can customize in Notix push messages:
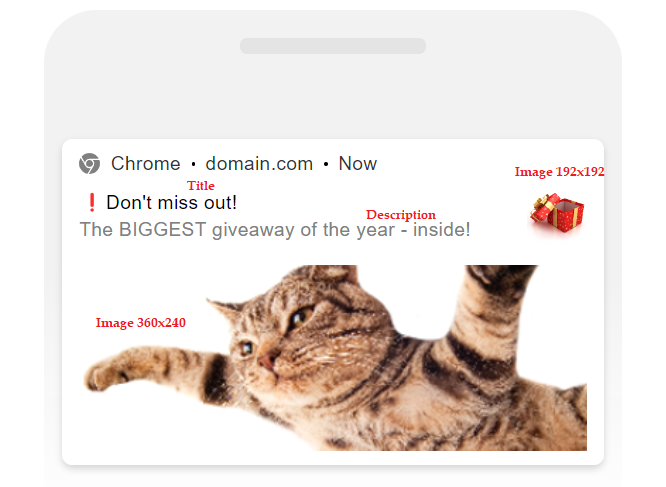
Don’t forget that you can add emojis in push notifications — and this might boost your CTRs!
And here are some tips and successful push messages examples for the top popular affiliate marketing verticals:
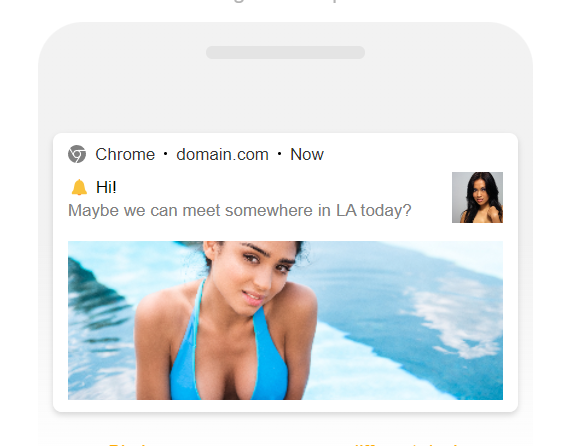
Social:
- Try imitating real voice or text messages
- Use real girls’ photos from photo stocks
- Add emotional triggers like ‘Feeling lonely?’ ‘Don’t want to spend this Friday night alone?’
- Customize messages depending on the targeted GEO
Depending on your offer, you can also try catching attention with informative messages like ‘5 ways to find your true love’ — with a happy family couple as a cover image.
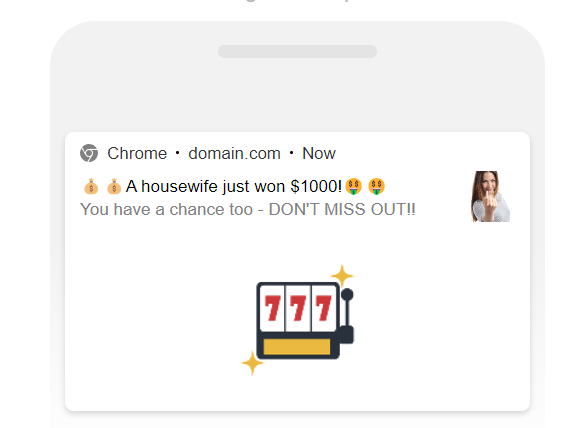
iGaming:
- Trigger emotions like envy: ‘A housewife just won $1,000, and you?’
- Use pictures associated with luck (clovers, jackpots, etc.)
- Create a feeling of urgency: Free spins are available ONLY TODAY!
You can play around with various images and texts — but remember the golden rule of A/B testing. Avoid spending the whole budget on a single creative, even if you think it’s flawless!
Notix Features to Boost Your Campaigns Performance
Now, finally, let’s see web push notifications for affiliate marketers in action! What can you do with the push to make your campaign flawless?
Here are Notix tools you are welcome to use.
Targeting
As an affiliate marketer, you know how important it is to deliver a message to the right people. Notix allows you to narrow your targeting to boost the CTR of your push notifications and keep users engaged with relevant content.
Here are the targeting options you can choose from:
- GEO: Country, region, city
- Devices: Platform, OS, device, browser, browser language
- User Behavior: Subscription date, Last activity on your landing page, Last click
- Audiences: users that you combined into a single group by particular parameters
Creating Audiences
Now that we touched upon audiences let’s look at how you can create them. Notix offers you three simple ways:
- Retargeting Pixels
You add a pixel to a certain part of a landing page, and all users who interact with this part are added to a separate audience.
Here is a detailed guide on how to set and work with Retargeting Pixels.
- Web Push Notifications Click Events
Another way to gather audiences is to do it through a certain browser notification. Here is how you do it:
- Create a push alert and set a click event for it in the sending settings:
- Send out the message. All subscribers who click this push notification will appear in a separate audience.
- Now you know who interacts with your notifications and who doesn’t. A great hint for a new engagement strategy for both groups!
- Categories Subscription Prompt
Remember the opt-in request prompts we mentioned above? One of them, called Categories, helps you to separate your audience by interests and topics automatically. When users choose a category of push notifications they want to receive, they instantly become a part of a particular audience.
Triggered Push
This feature comes in handy when you want to automate your push notification efforts but keep the personal touch to users.
As the name suggests, such push notifications are sent out upon a particular trigger that you set. For example, this can be a certain action — say, a click or registration — or no action, e.g., no click and no registration.
Message Scheduling and Sending Time
You can send push notifications whenever you want. However, statistics show that sending time matters for CTRs and overall engagement.
If this study inspired you enough, don’t forget to play around with some sending settings:
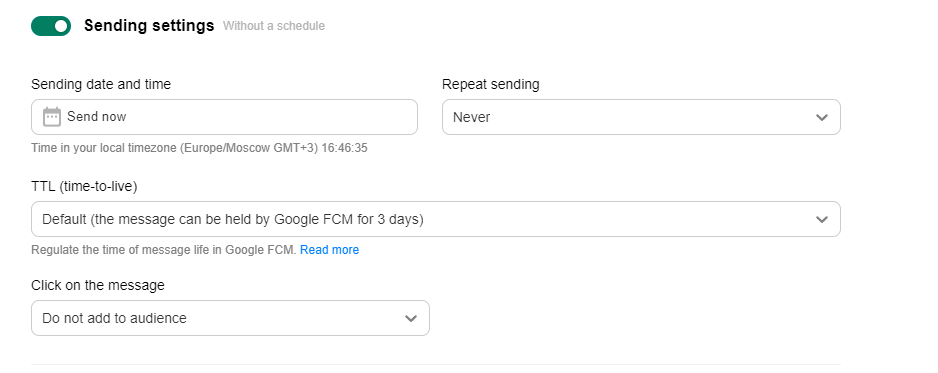
Let’s see what these settings are about:
- Sending date and time — a pretty obvious one, right? If you skip this part, your message will be simply sent out right away.
- Repeat sending — a feature that allows you to send the same message several times.
- Time-To-Live (TTL) — a tool that will automatically resend a push notification if a user doesn’t receive it, but will stop trying after a particular time you indicate.
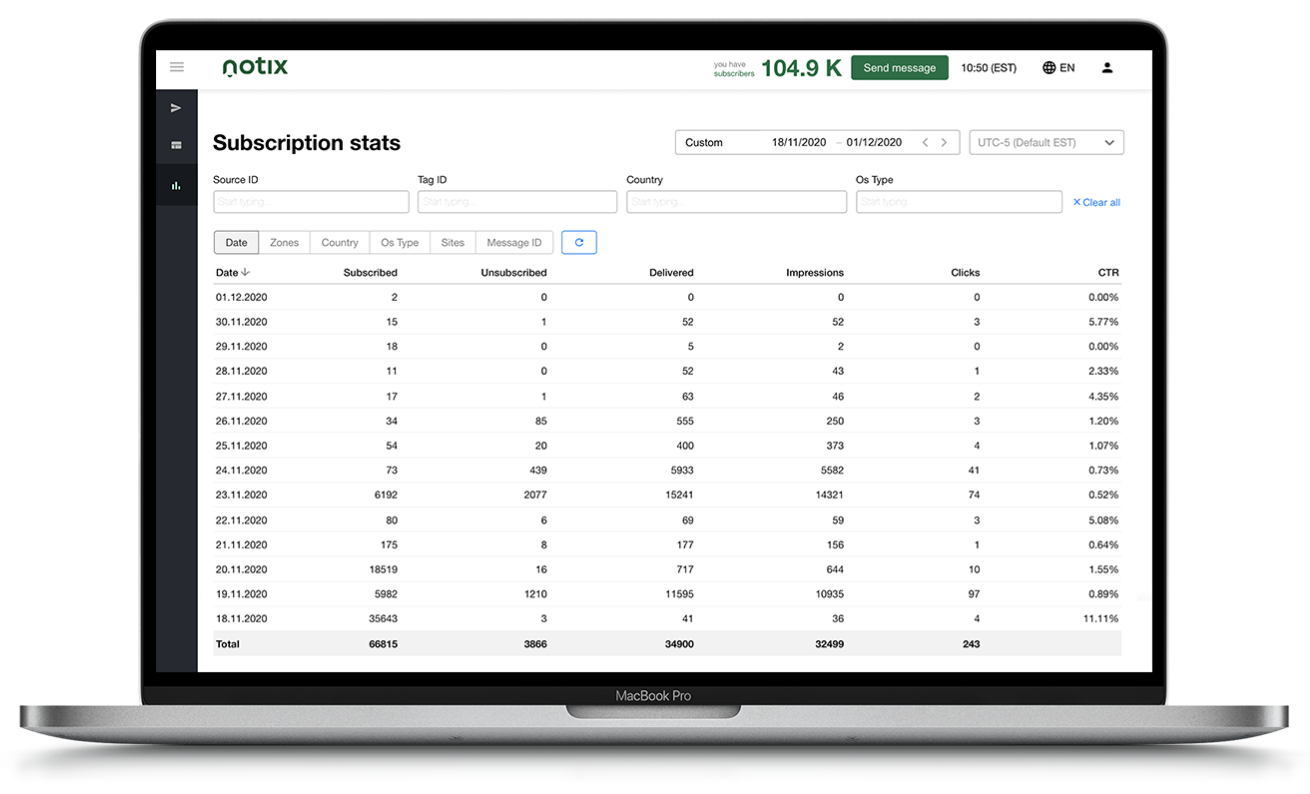
Performance Tracking
You can always check how your messaging campaign is going on. Notix Dashboard has convenient real-time statistics with the following filters:
- Message ID
- Tag ID
- Country
- OS Type
Notix Pricing Plans
We are proud to be flexible — and even free of charge sometimes! Let’s see what pricing plans are available for Notix customers.
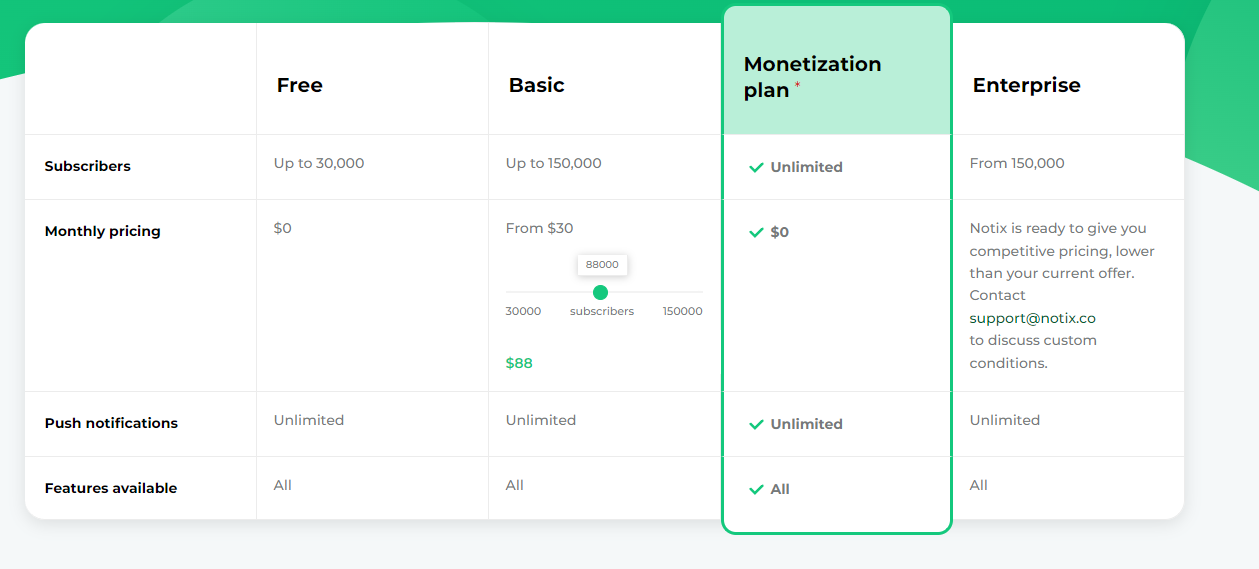
Plan 1: Free Unlimited Push Notifications
If you have less than 30k subscribers in your base, you don’t pay anything for your push message service. And no limits — all the features, tools, and extras are available to you.
Plan 2: Basic
When you gather 30k subscribers, the conditions change. The pricing plan for 30-150k user bases varies from $30 to $150 — in other words, you pay $1 for every 1000 subs.
Plan 3: Enterprise
Are you doing so well that you have collected more than 150k subscribers? That’s impressive — and you obviously need some special offer. In this case, we will gladly discuss custom conditions: just contact us at support@notix.co.
Monetization Plan
This one kills two birds with one stone:
- Notix becomes a free push service for you, no matter how big your base is
- You monetize your subscribers with brand-safe ads that appear alongside your regular notifications
Why is it a real bargain for marketers?
When you run affiliate marketing campaigns, you sometimes spend much during the testing period. It is especially relatable when you work with low-payout offers that might devour a big part of your budget before bringing any profit.
So why not compensate for testing expenses by monetizing your subscribers — and never paying for push notifications anymore? Monetization won’t spoil the main offer flow — and you can choose the push ads topics and frequency.
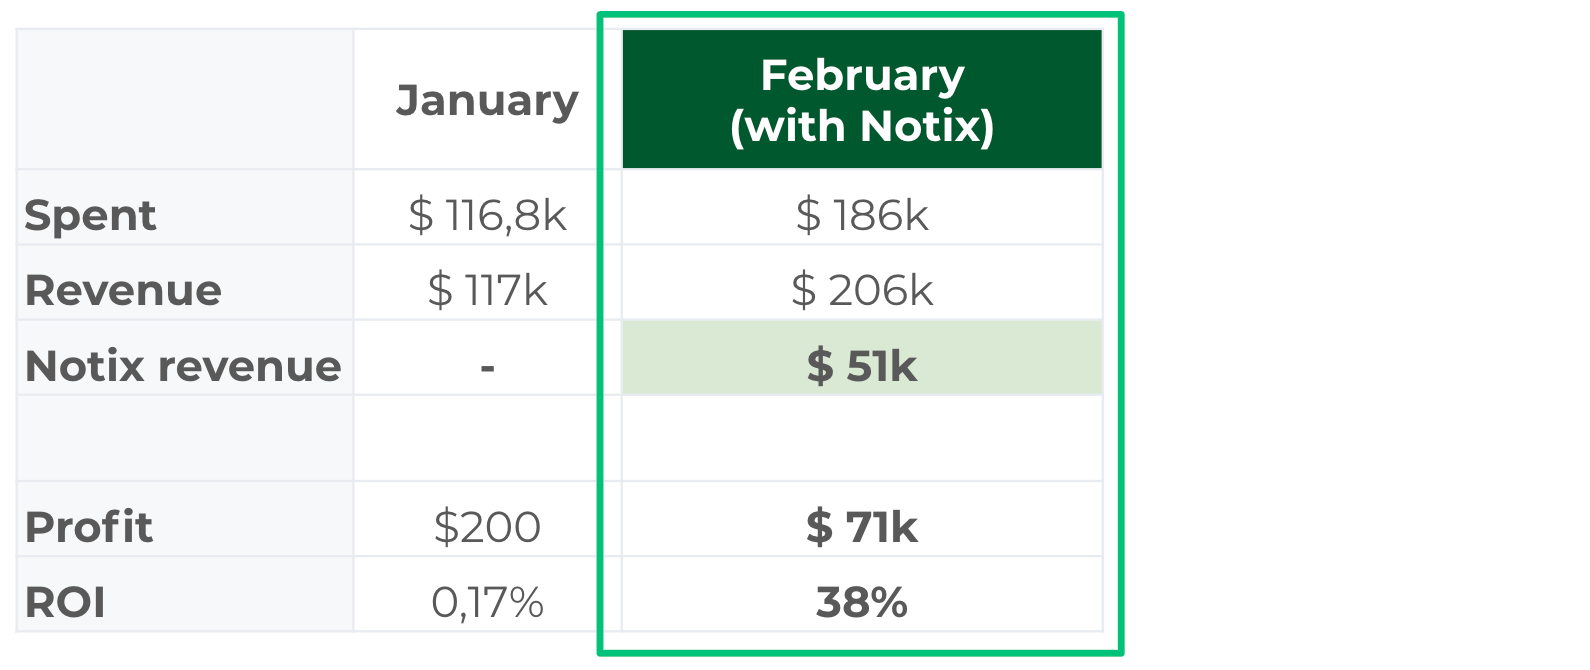
Notix in Action: Case Study
To show you how Notix really works, we asked one of our partners to share his success story. So here it is — one of the great push notification marketing examples!
About the Campaign
- Traffic Type: Mainstream
- Format: Popunder
- Opt-in Creative: Survey Offer Landing Page
- ROI: from 0.17% to 38%

The advertiser aimed to keep working with the offer but increase its ROI. So, he added Notix to his landing pages.
What Did the Partner Do With Notix?
He opted for the following workflow: he chose several more best-performing offers and sent them via push to subscribers. To do it wisely, he used the following Notix tools:
- Regular messages,
- Scheduled messages,
- Targeting by subscription dates,
- Targeting by country, browser language, platform, and device.
| As a result, the total profit Increased from $200 to $71 000 — and the client achieved 38% ROI. |
To know more about this case, read it in detail here.
Now you are equipped enough to start — but if you have any questions, contact us at support@notix.co — we will be happy to help.
And we are looking forward to seeing you with us —